- Published on
How to add Custom attribute or element search in AEM Assets UI
- Authors

- Name
- Khalil
- @Im_Khalil
AEM does not natively support DITA content, meaning there's no built-in functionality for searching DITA content or searching by UUID within its repository. However, with AEM Guides allows you to add the DITA content search and UUID-based search capabilities in the AEM repository.
Setting up DITA content search involves following steps:
- Add DITA Element search component in Assets
- Add custom elements or attributes in search
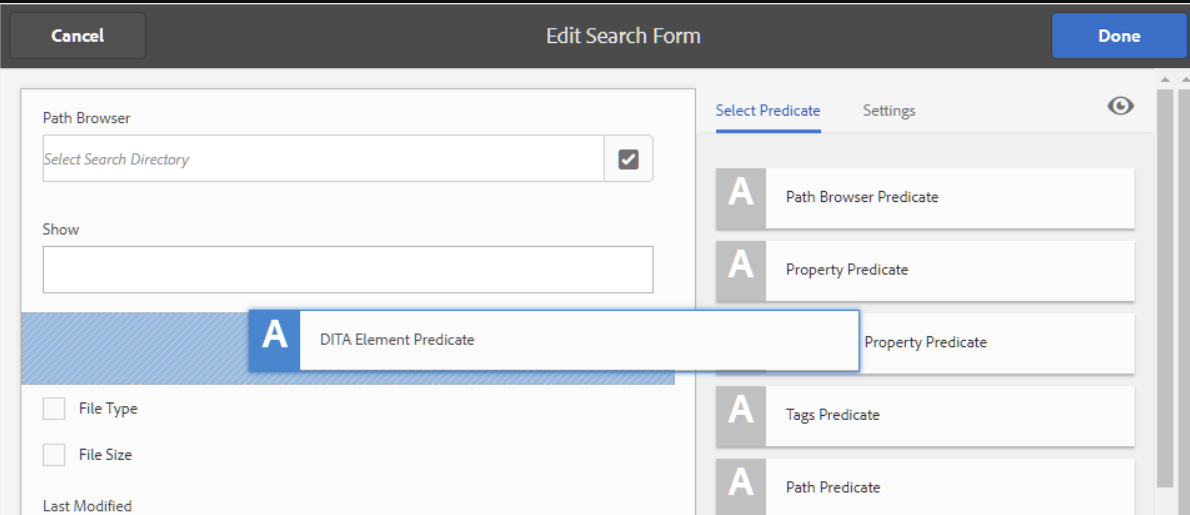
Add DITA Element search component in Assets UI: Follow the below steps to add DITA content search component in AEM Assets UI.
- Log into Adobe Experience Manager as an administrator.
- Click on the Adobe Experience Manager link at the top and choose Tools.
- Select General from the list of tools and click on the Search Forms tile.
- In the Search Forms list, select the Assets Admin Search Rail.
- Click Edit.
- In the Select Predicate tab, scroll to the end of the list.
- Drag-and-drop DITA Element Predicate at the required location in the search form.

- Click Done to save your changes.
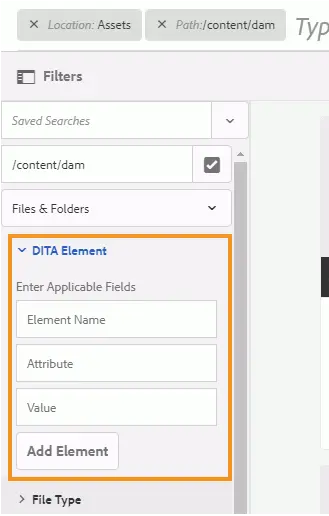
When you access the Filters option in the Assets UI, you will get the DITA Element search filtering option. 
Add custom elements or attributes in search:
To make DITA search work, we need to prepare the DITA content first. This means taking out specific parts from each DITA map and topic so they can be quickly found when searching. This process is called Serialization. Serialization happens when we upload content or when we decide to do it. It follows a plan laid out in a file to figure out how much content from each DITA file should be made searchable. The standard place for this file is:
/libs/fmdita/config/serializationconfig.xml
The initial search setup lets you look for everything in the DITA prolog element. If you want to find things based on different parts, you'll need to adjust the search setup file.
This file contains two main sections—attribute set and rule set. A snippet of the rule set section is given below:
<ruleset filetypes="xml dita"><!-- Element rules --><rule xpath="//[contains(@class, 'topic/topic')]/[contains(@class, 'topic/prolog')]//*[not(*)]" text="yes" attributeset="all-attrs" /><!-- Attribute rules --><rule xpath="//[contains(@class, 'topic/topic')]/[contains(@class, 'topic/prolog')]///@[local-name() != 'class']" /></ruleset
In the rule set section, you can specify:
- Rules to extract the elements
- Rules to extract attributes
A rule consists of the following:
xpath This is the XPath query that retrieves the elements or attributes from DITA files. The default configuration for the element rule retrieves all prolog elements. And, the default configuration for the attribute rule retrieves all attributes of prolog elements. You can specify an XPath query to serialize the elements or attributes that you want to search for. The XPath query contains the class name of the document type. The
topic/topicclass is used for topic type DITA documents.text
If you want to search for the text within the specified element, then specify the yes value. If you specify no as value, then only the attributes within the element are serialized. The attributes that you want to search for need to be specified in the attribute set section.attributeset
Specify the ID of the attribute set that you want to associate with this rule. The value all-attrs is a special case to indicate that all attributes for this rule must be serialized.
An attribute set contains a list of attributes that you want to search for within DITA content. The attribute set contains the following:
- id
A unique identifier for the attribute set. This id is specified in the attributeset parameter of a rule set. - attribute
A list of attributes that you want to search. For each attribute, you need to create an individual entry in theattributeelement.
Perform the following steps to add custom DITA elements or attributes in the search serialization file:
- Use the Package Manager to download
/libs/fmdita/config/serializationconfig.xmlfile. - Create an overlay node of the
configfolder within theappsnode. - Navigate to the configuration file available in the
appsnode:/apps/fmdita/config/serializationconfig.xml - Add the required element or attribute rule sets.
- Commit the changes and run the Cloud Manager (CI/CD) pipeline to deploy configuration changes.
The new serialization information is stored and activated for search. However, you must extract the metadata from your existing DITA content to become available for search.
Extract metadata from existing content Once you've changed the default search setup file, you need to turn on the DITA Metadata Extraction option in the com.adobe.fmdita.config.ConfigManager bundle and then start the workflow to get metadata. This pulls out the needed metadata from the DITA files you already have, making it ready for searching.
If you make new files or edit existing ones after updating the search setup file, the metadata is automatically taken from those files. You only need to manually extract metadata for files already in the AEM repository.
To get metadata from existing DITA files, you have to do two things:
- Turn on the metadata extraction option in the configMgr.
- Start the metadata extraction workflow.
Perform the following steps to run the metadata extraction workflow:
- Log into Adobe Experience Manager as an administrator.
- Click on the Adobe Experience Manager link at the top and choose Tools.
- Select Guides from the list of tools and click the DITA Metadata Extraction tile.
- If you want to extract metadata from a single file and its dependencies, click the Select a File link and browse for a file.
- If you want to extract metadata from multiple files within a folder, click the Select Folder(s) link, browse and select the required folder. Click the Add button to add the folder to the serialization task list.
You might also like to read
- 1.SegmentNotFoundException in AEM - How to Fix It Safely
- 2.AEM Dispatcher Series 1 - A Developer’s Guide to What It Is and Why You Should Care
- 3.AEM Dispatcher Series 2 - Understanding the `dispatcher.any` File
- 4.AEM Dispatcher Series 3 - Securing Your AEM Site - Deep Dive into Dispatcher `/filter` Rules
- 5.AEM Dispatcher Series 4 - A Developer’s Guide to Dispatcher `/cache` Rules